DNSSEC: Build a Chain of Trust to Stop DNS Attacks

Imagine you type the URL of your bank into the browser and get a login page. After you enter credentials, you get a notification from your service that a new login has been registered. You ignore it and soon find your bank account emptied by unknown actors. What happened? The IP address behind that bank domain name has been silently changed to one controlled by an attacker.
The attack is called DNS spoofing or DNS cache poisoning. In this scenario, the attacker causes the bank's domain name to resolve to a malicious IP address. This directs users' requests to a fake server. It can be difficult to notice: the address bar still shows the correct website name and fake sites look real.
Even more, if the attacker runs a reverse‑proxy, the user receives the genuine webpage keeping the original domain name in the address bar. The user sees a perfectly normal page that makes it impossible for them to understand that someone is already stealing their data. This dangerous type of attacks is called DNS‑based Man‑in‑the‑Middle (MITM).
How to stay safe
There is no direct foolproof method to detect DNS spoofing from the user's side. They must rely on indirect safeguards, like checking a website’s SSL certificate or comparing certificate fingerprints to ensure they match expected values. Let’s be honest: even tech-savvy users rarely verify hashes in their daily browsing and even then, it doesn’t provide a direct way to detect a DNS spoofing attack.
This shifts the main responsibility for safeguarding users' data from DNS-based attacks to the infrastructure level and domain owners.
Domain Name System Security Extensions (DNSSEC) is designed to prevent DNS spoofing attacks. It was developed in the 1990s and standardized by the IETF. DNSSEC adds cryptographic signatures to DNS records to verify their authenticity and integrity, addressing key vulnerabilities in the standard DNS protocol. DNSSEC creates a chain of trust from the DNS root down to individual domains, preventing tampering during resolution.
How Does DNSSEC Work?
DNSSEC uses digital signatures that are generated using public‑key algorithms such as RSA or ECDSA.
Let's review some definitions first, related to DNSSEC:
-
RRSIG (Resource Record Signature): Digital signatures for DNS record sets. They verify that the data hasn't been tampered with and ensure data integrity.
-
DNSKEY RRset: Contains the public keys: Key Signing Key (KSK) and Zone Signing Key (ZSK). KSK signs the DNSKEY record set, the ZSK signs the actual data (A, MX, etc.).
-
NSEC/NSEC3 RRset: Provides authenticated denial of existence. It cryptographically proves that no records exist between two points in your zone's alphabetical list. If someone queries a subdomain that doesn't exist (e.g.,
fake.example.com), your name server returns a NSEC or NSEC3 record, preventing spoofing attacks. -
DS RRset (delegation signer): Contains a hash of the child's KSK. It resides in parent zone's DS RRset which is signed by the parent's private key. It "bridges" zones, actually ensuring the chain of trust in DNSSEC.
When you enable DNSSEC, the process of DNS resolution changes from a simple request-and-receive system into a request-verify-and-trust system. The name server starts generating and serving several new types of security records: RRSIG, DNSKEY, NSEC/NSEC3.
A recursive resolver fetches data, verifies signatures against keys, and verifies the chain of trust from the root down to the queried zone.
Validation fails if any signature mismatches or keys are absent, prompting a SERVFAIL response.
How Data is Verified
Assume example.com is your domain.
When a recursive resolver receives a request for example.com, its cache is initially cold. The resolver has no knowledge of the domain's keys or signatures. It must build a chain of trust, starting with a hardcoded Trust Anchor (the Root Zone's public key). The resolver sets the DNSSEC OK(DO) bit in the header of its outgoing queries to notify that it is security-aware and starts digging.
Step A: The Root Zone (.)
- Query: The resolver asks the Root servers for
example.com. - Response: The Root doesn't know the IP, so it provides a referral to the
.comname servers (NS records), the DS record for.com, and the RRSIG for that DS record. - Key Fetch: The resolver makes a separate query to fetch the Root DNSKEY.
- Verification: The resolver starts with its built‑in trust anchor (the public part of the root KSK) and uses it to verify the RRSIG on the root zone’s DNSKEY RRset. Once the root DNSKEY set (KSK + ZSK) is trusted, the resolver uses the root ZSK to verify the RRSIG that covers the
.comDS record. If that verification succeeds, the resolver has a proven cryptographic link to the.comzone.
Step B: The TLD Zone (.com)
- Query: The resolver asks the
.comname servers forexample.com. - Response: The name servers respond with a referral to the authoritative name servers for
example.com: the NS records, (e.g.,ns1.example.com), the DS record and the RRSIG the DS record. - Key Fetch: Before trusting this response, the resolver must verify the RRSIG on the
example.comDS record. It fetches the.comDNSKEY set. The resolver confirms the DNSKEY is legitimate by comparing it to the DS record for.com(verified in Step A). - Verification: Once the
.comDNSKEY set is trusted, the resolver uses the.comZone Signing Key (ZSK) to verify the RRSIG on theexample.comDS record.
Step C: Your Domain (example.com)
- Query: Finally, the resolver asks your name servers for the
Arecord ofexample.com. - Response: The name server returns the IP address (A record) and the digital signature for that record (RRSIG)
- Key Fetch: The resolver fetches the DNSKEY set for
example.comand verifies it using the DS record forexample.com(which was verified in Step B). - Verification: the resolver uses the verified
example.comZone Signing Key (ZSK) to verify the RRSIG on the A record.
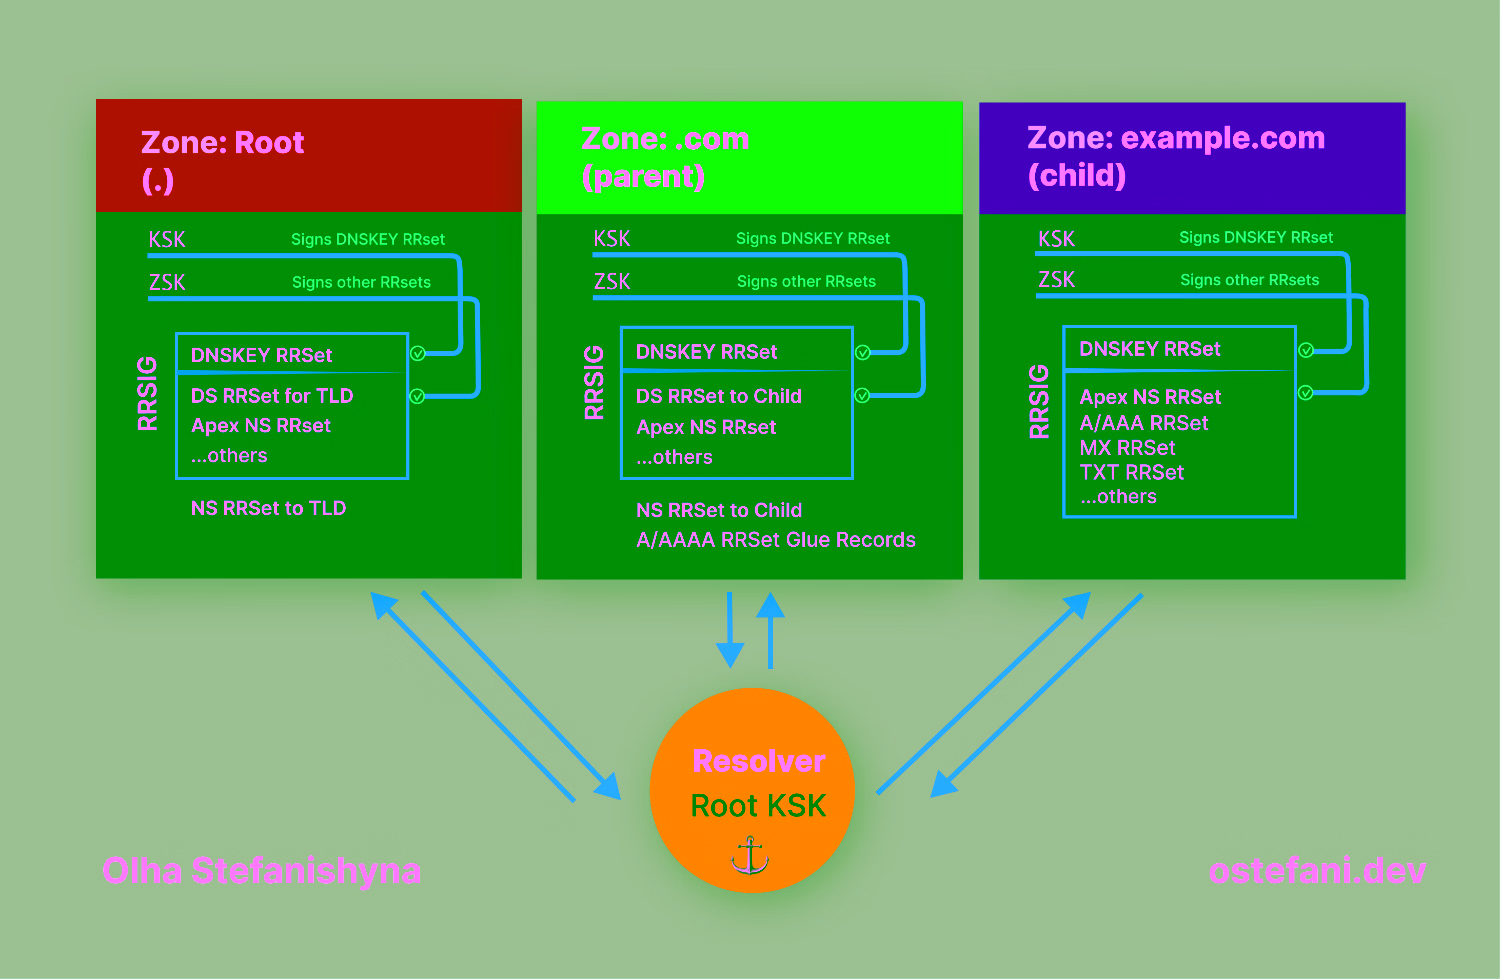
If the signature matches, the resolver knows the IP address hasn't been tampered. The user’s browser then receives the authentic IP address, and the connection is established securely.
Technical and Operational Changes
There are a few important things to keep in mind when you enable DNSSEC:
- Packet Size: DNS responses get significantly larger. A normal DNS response might be 100 bytes; a DNSSEC response can be 1,000+ bytes because of the signatures. This sometimes causes issues with older firewalls that expect tiny packets.
- CPU Workload: The resolver has to do cryptographic math, verifying hashes and signatures, for every single query, which takes more processing power and requires more time.
- Consequences of a Mistake: If you forget to renew your signatures or misconfigure your keys, the resolver will see it as a hack attempt, and your domain will disappear from the internet with a
SERVFAILerror.
Unlike DNS encryption, which protects the confidentiality of DNS queries, DNSSEC provides authentication to ensure responses haven’t been tampered with, though they remain plaintext. Almost all top-level domains are now signed, but adoption for individual domains is lower due to configuration hurdles and lack of awareness among domain owners.
How to Enable DNSSEC
To enable DNSSEC use your DNS provider’s tools to generate keys: ZSK to sign DNS records and KSK to sign other keys. Store them securely in a hardware security module or secure vault. Your DNS provider will sign your zone files (A, MX, CNAME records) with the ZSK to create RRSIG records. Create the DS Record from the public part of the KSK and submit it to your domain registrar. This links your domain to the signed zone and completes the chain of trust.
Note: DNSSEC keys and signatures have expiration dates. If not renewed in time, your domain can dissapear from internet. The DNS provider may manage key rollovers, but it's important to monitor this process to ensure your domain is always available.
To make sure everything is working, test DNSSEC in the terminal:
bash1# The +dnssec flag tells dig to request DNSSEC records.2# @1.1.1.1 ensures the query is sent to a resolver that supports DNSSEC validation.34dig +dnssec @1.1.1.1 example.com
A successful test will show the authentic data (ad) flag in the header and RRSIG records in the response, confirming the zone is signed and DNSSEC is active.
Or use online tools like dnsviz.net or dnssec-analyzer.verisignlabs.com
Conclusion
Traditional DNS trusts responses without verification, making it prone to forgery.
DNSSEC solves this by ensuring data origin authentication and integrity, confirming responses come from the claimed authoritative server and remain unaltered.
DNSSEC prevents forgery-based attacks by cryptographically validating every response, protecting against: cache poisoning (DNS spoofing), DNS-based Man-in-the-Middle (MitM) attacks, DNS replay attacks, DNS Hijacking.
This relatively small operational investment significantly strengthens your domain’s security and closes a critical attack vector.
To further improve the security of your domain name, learn about HSTS in my article HSTS: Close Your Site's Security Gap.